Rocky Mountain Outfit — American Mountain Men (AMM) party of Colorado
Review of Kannik's Korners "Man's Shirt 1750 – 1800"
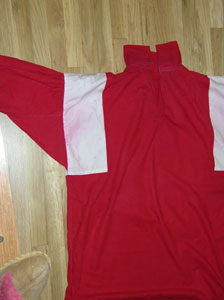
Shirt is shown inside out with shoulder
reinforcement in white. Note unwashed ring
around the collar stain.
Overview
The goal of this project was to create a basic square cut shirt appropriate for the rendezvous years. This pattern combined with the measuring methods in Gehret's Rural Pennsylvania Clothing resulted in a very successful project. I would use this pattern again and recommend it to others, though using the Gehret's measuring method.
I would give this pattern a rating of 5 out of 5. Excellent directions and period detail, with the caveat that working men's shirts are not as wide as fine linen gentlemen's shirts, so figure on roughly 30" to 32" wide for the body of the shirt. The directions alone on this shirt are worth the money.
How It Went
My first shirt was made from the directions in Tidings from the 18th Century. It made a usable shirt but with more research I found out it wasn't the style being worn in the 1820s and 30s. The later shirts mostly had wider cuffs with a single button placed close to where the cuff met the sleeve rather than centered on the cuff. Also linings about 3" to 6" wide on the inside of the shoulders were common.
The Kannik's sewing directions are clear and their research good. The only problem with the Kannik's pattern is that it has you make the body of the shirt 40" wide. This is OK for fine linen dress shirts but too balloon-sized for a working man's shirt. I finally started using Gehret's measurement methods combined with the Kannik's directions to get an authentic, good fitting shirt for our period.
The Best and Worst of It
The best was the Kannik's sewing directions which shows you how to make an accurate, hard wearing shirt.
The worst was making two shirts before figuring out that the Kannik's shirts were too wide for me. Kannik's had the shirt body 40" while the Gehret measurements has me at 31".
Is it Recommended?
Yes. This is a fairly simple project with a good chance of success. Historically appropriate fabrics are relatively cheap and you can wear your first try. Fit on these shirts is not a matter of fancy tailoring but gathering at the neck and shoulders along with gussets at the neck and under the sleeves. If there is any one piece of clothing to learn to make yourself, this is the one.
Hints and Notes
Don't apply modern ideas of what a shirt should look like to these square cut shirts. Make your measurements, follow the directions. If you try to "improve" on the old way of doing it you will make a shirt that fits worse rather than better.
From what I gather from journals and ledgers, cold weather meant several shirts layered over one another rather than a heavy "blanket shirt" (a term I've only seen in modern references). That said, farmer's work frocks of the period were basically larger versions of the basic, pullover shirts, sometimes made of outer weight wool fabrics for cold weather. A blanket shirt by any other name…
Cotton had become a more and more common fabric for shirts by the rendezvous years, often replacing linen for work shirts. Fancy dressier shirts were still made with the cuffs and collars (the parts that showed) out of linen, or even all linen, but work shirts were mostly cotton by the 1830s.
Use Museum of the Fur Trade Quarterly articles on trade calicos to get an idea of what simple calico prints looked like. Use quilter's resources for dating calico fabric to get an idea of what was available during the rendezvous period. Try to develop an eye for simple prints with the characteristics of the period, remembering that the fur companies would probably have stuck to simple one or two color prints on a background color instead of the more expensive multi-color prints. Keep in mind early calicos were sometimes resist dyed, which would give a print with no back side.
If you want to be showy, Indian trade shirts were often eye-popping prints with ruffles at the neck, collar and cuffs. A few might have made it out with the Delaware and Shawnee trappers working for the companies.
Check for calicos from suppliers of quilter's fabrics. Check out collections like "Sturbridge Village" and "Moda" every now and then because they sometimes carry simple prints that have a good trade shirt look. These collections change year to year.
If fooling with prints seems like too much trouble, look for simple one color checks on a natural background. You'll sometimes see these at Civil War suppliers. The supplier Wm. Booth Draper has a good selection of checks and stripes. Blue was a common color for both checks and stripes, probably because indigo was a common and colorfast dye at the time.
Cruise local fabric stores for sales, especially sales on wool flannel. In the old days the word flannel meant wool. Memorize the red in "Trapper's Bride" and other period paintings to get the early color. Later aniline red is a harsher color. Some places will put Pendleton shirt wool on sale and their plain red is a pretty good one.
If you get interested in shirts get a copy of Thoughts on Men's Shirts 1750 – 1900 by Brown.
Alternatives
- The excellent directions in Gehret's Rural Pennsylvania Clothing.
- The directions from Tidings from the 18th Century with details updated to the 1820s – 30s.
Documentation Used
- Miller: "Trapper's Bride" (red wool color); Crows Threatening Stewart "The Crows Attempting to Provoke and Attack from the Whites…" (striped shirt in the background); Bill Burrows Rocky Mountain Trapper (printed calico)
- Photos of the exhumed Franklin Expedition graves on Beechy Island Ca. 1846, available online (blue stripe, dark plain and different than usual cut)
- Fort Union Trading Post ledgers from their web site
- Rural Pennsylvania Clothing, Ellen J. Gehret
- Thoughts on Men's Shirts 1750 – 1900, William L. Brown III
- R.M. Ballantyne's descriptions of HBC cotton shirts ca. 1840 – 1845